Activating an eSIM on iPhone
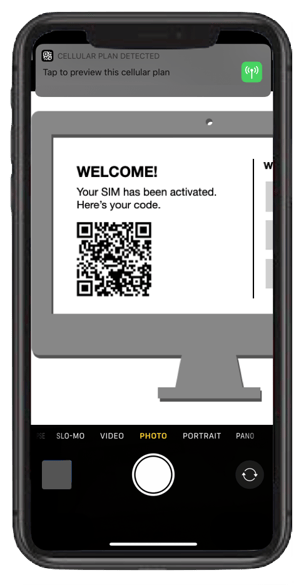
Step 1: Open your phone’s camera application and hold it up to the QR code that is displayed after the activation process. This QR code was also sent to you by email. Click the link in your after-activation email to get your QR code.

Step 2: As you scan, you’ll get a popup that says “Tap to preview this cellular plan”.
Step 3: Tap on the popup and you’ll be redirected to the Cellular Plan Settings section in your phone, which will walk you though the eSIM setup process.
Step 4: Tap on Continue, then tap on Add Cellular Plan.
Having trouble?
Getting an "Unable To Add Cellular Plan" error message? Try getting to the cellular plan section another way. Instead of scanning with your phone camera, tap on your phone's Settings application, then tap on Cellular, then tap on Add Cellular Plan. From there, scan the QR code.
Step 5: Next, you'll need to label your eSIM line and choose to make your new SIM the Primary or Secondary SIM card.
Step 6: Decide which line is going to be your default line. This means, if you attempt to call a number that is not already in your contact list, your phone will automatically choose your default line for calling and texting to that number.
On some phones, you can temporarily turn your eSIM profile off (similar to the way you can turn WiFi usage off and on). This is fine, and will not cause you to lose your eSIM profile.
Important! Removing or deleting your eSIM is permanent. Avoid removing any eSIM unless you no longer plan to use that wireless plan.
Step 7: Choose which of your lines, if any, should be associated with your iMessage, FaceTime and Apple ID. This means, when it's time to send an iMessage or place a call using FaceTime, which line would you like to be associated with those texts and calls?
Step 8: Finally, choose which line you'd like to be your primary line for data usage. This means, when downloading applications, browsing the web, or using data-reliant calling features like VoLTE, which line would you like your phone to rely on? You can switch the default cellular data line in the future.
You can also enable Cellular Data Switching. This means, your phone will attempt to use the default selected line first, but if coverage is not optimal for that line, your secondary line will be used.
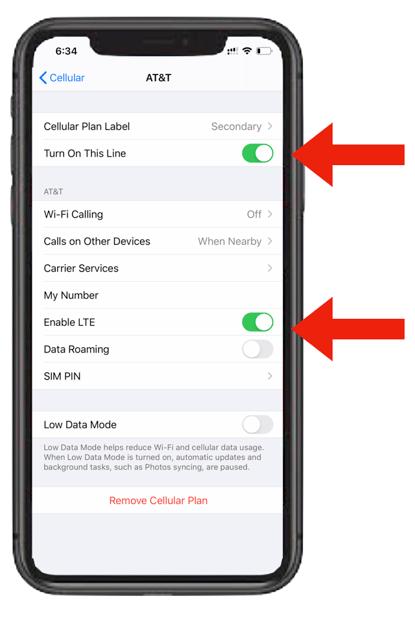
Step 9: Turn the newly activated line ON after you have finished configuring your eSIM preferences.
When you're finished configuring your preferences, you'll be taken to the Cellular section within your phone's Settings. If you are not taken there automatically, you can navigate there by tapping on Settings, then tapping on Cellular.
From there, tap on your newly installed eSIM line under CELLULAR PLANS and make sure the toggle labeled "Turn On This Line" is set to the ON position. Check the "Enable LTE" toggle as well and make sure it too is set to the ON position. This will ensure your line is connected and your device is receiving a signal.
Note: On some, newer phones, this step is not required.

Activating an iPhone without access to a Wi-Fi network
If you have an eSIM-only iPhone (iPhone 14 series models and newer), and you don’t have a Wi-Fi network, Apple has a new solution to activate your eSIM. During the Set Up process, you can choose to continue without Wi-Fi. This allows you to setup your new eSIM without Wi-Fi —at no cost to you. Learn more about eSIM on iPhone here: https://support.apple.com/en-us/HT212780.
Having trouble?
If you are unable to scan the QR code to activate your eSIM, you can setup your new line of service using your plan's activation code. See manual setup steps.